Showing posts with label Tutorial. Show all posts

Friday, July 22, 2016

jQuery - Searching a multi-dimensional array

Last days ago, I had an issue to search multi-dimensional arrays in JavaScript / jQuery.
This post will give you a quick example how it works.

First we create an multi-dimensional array.
In my example we create an array for each employee...

var hansi = { firstName: "Hansi", lastName: "Hansen", wage: "2000" };
var paul = { firstName: "Paul", lastName: "Paulsen", wage: "1900" };
var otto = { firstName: "Otto", lastName: "Ottensen", wage: "1500" };
var thomas = { firstName: "Thomas", lastName: "Tomate", wage: "2500" };

...and then push them all together in another array. And here is our multi-dimensional array:

var employees = [hansi, paul, otto, thomas];

Now we want to search for an employee with the first name "Thomas", so we define a variable with the search term:

var searchValue = "Thomas";

Then we use the grep function from jQuery to search for the term "Thomas" in our multi-dimensional array:

var result = $.grep(employees, function (e) {
   return e.firstName == searchValue;
});

Now we just need to check our results variable:

if (result.length == 0) {
   alert('Error: ' + searchValue + ' not found');
} else if (result.length == 1) {
   employee = result[0];
} else {
   alert('Error: Multiple items found');
}

See the results:

Employee Details: First Name: Thomas / Last Name: Tomate / Wage: 2500

Here is the complete code again:

<!DOCTYPE html>
<head>
<script   src="https://code.jquery.com/jquery-3.1.0.min.js"   integrity="sha256-cCueBR6CsyA4/9szpPfrX3s49M9vUU5BgtiJj06wt/s="   crossorigin="anonymous"></script>
<script type="text/javascript">
$(document).ready(function() {

var hansi = { firstName: "Hansi", lastName: "Hansen", wage: "2000" };
var paul = { firstName: "Paul", lastName: "Paulsen", wage: "1900" };
var otto = { firstName: "Otto", lastName: "Ottensen", wage: "1500" };
var thomas = { firstName: "Thomas", lastName: "Tomate", wage: "2500" };

var employees = [hansi, paul, otto, thomas];

var searchValue = "Thomas";
var result = $.grep(employees, function (e) {
return e.firstName == searchValue;
});

if (result.length == 0) {
alert('Error: ' + searchValue + ' not found');
} else if (result.length == 1) {
employee = result[0];
} else {
alert('Error: Multiple items found');
}

document.write("Employee Details: ");
document.write("First Name: " + employee.firstName + " / ");
document.write("Last Name: " + employee.lastName + " / ");
document.write("Wage: " + employee.wage + " ");
});
</script>
</head>
<body>
</body>
</html>


Monday, January 11, 2016

Tutorial - SQL Server 2014 Express - Job automation

Hi guys,

as you know, in Express Editions of Microsoft SQL Server the agent is not available. So it is difficult to create jobs, which run automated.
I've found a nice way via the command line to create automated SQL jobs without the SQL Server Agent.

First create your SQL statement and save it in an extra file. Name it i.e. "sqlCommand.sql".
Maybe you want to make a daily backup of your database, you create a statement like this, but it can be any valid SQL statement. This is just an example.

BACKUP DATABASE [db_myDatabase] TO  DISK = N'C:\Backup\SQL Server\db_myDatabase.bak' WITH NOFORMAT, INIT,  NAME = N'db_myDatabase-Full Database Backup', SKIP, NOREWIND, NOUNLOAD,  STATS = 10, CHECKSUM
GO
declare @backupSetId as int
select @backupSetId = position from msdb..backupset where database_name=N'db_myDatabase' and backup_set_id=(select max(backup_set_id) from msdb..backupset where database_name=N'db_myDatabase' )
if @backupSetId is null begin raiserror(N'Verify failed. Backup information for database ''db_myDatabase'' not found.', 16, 1) end
RESTORE VERIFYONLY FROM  DISK = N'C:\Backup\SQL Server\db_myDatabase.bak' WITH  FILE = @backupSetId,  NOUNLOAD,  NOREWIND
GO


I you have Microsoft SQL Server 2014 Express installed, you can navigate via command line to the following directory:

"C:\Program Files\Microsoft SQL Server\110\Tools\Binn"

In this directory you find a executable named "sqlcmd.exe".


This executable you can use to execute your SQL Statement saved in your file "SqlCommand.sql".
Replace <server> with your server / machine name and <sqlInstance> with your instance of your SQL Server. The parameter -i tells the executable what SQL script should run. Replace it where your SQL script is saved.

sqlcmd -S <server>\<sqlInstance> -E -i "C:\Jobs\SQL Server\SqlCommand.sql"

When you press enter, the command(s) in your SQL script will be executed.
Now you just have  to create a simple command line script, which can be executed in a task scheduler job.

Command-line script:
c:
cd\
cd "C:\Program Files\Microsoft SQL Server\110\Tools\Binn"
sqlcmd -S <server>\<sqlInstance> -E -i "C:\Jobs\SQL Server\SqlCommand.sql"


That's it. :-)

Tuesday, November 24, 2015

SharePoint 2010 - Tutorial - Hiding Ribbon Items

Today I want to show you, how you can hide items from the ribbon bar.
We start as usual with an empty SharePoint project.
Add a new item to the project: User Control and give it a name (i.e. "RibbonControl.ascx").


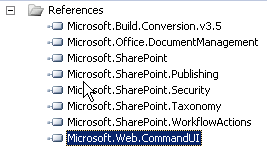
Add the "Microsoft.Web.CommandUI.dll" reference from "c:\program files\common files\microsoft shared\web server extensions\14\isapi"-folder to your project.


Then open the code-behind file. In my case it is "RibbonControl.ascx.cs".


Add the following namespaces to your code:

using Microsoft.SharePoint;
using Microsoft.SharePoint.WebControls;
using Microsoft.Web.CommandUI;

Use the ribbon.TrimById() method to hide items in the ribbon bar.
Here are some examples. See a full list of all ribbon items here:

https://msdn.microsoft.com/en-us/library/office/ee537543(v=office.14).aspx

protected void Page_Load(object sender, EventArgs e)
{
            try
            {
                SPRibbon ribbon = SPRibbon.GetCurrent(this.Page);
                using (SPSite site = SPContext.Current.Site)
                {
                    //"Documents"-tab
                    ribbon.TrimById("Ribbon.Documents.Copies");
                    ribbon.TrimById("Ribbon.Documents.Workflow");
                    ribbon.TrimById("Ribbon.Documents.Share");
                    ribbon.TrimById("Ribbon.Documents.Manage.ManagePermissions");
                    ribbon.TrimById("Ribbon.Documents.TagsAndNotes");

                    //"Library"-tab
                    ribbon.TrimById("Ribbon.Library.ViewFormat");
                    ribbon.TrimById("Ribbon.Library.Share");
                    ribbon.TrimById("Ribbon.Library.Datasheet");
                    ribbon.TrimById("Ribbon.Library.Actions");
                    ribbon.TrimById("Ribbon.Library.CustomizeLibrary");
                }
            }
            catch (Exception exp)
            {
                throw exp;
            }
}

Then your user control is ready now.
The next step is to add your user control whereever you need it, i.e. to your master page, page, web parts etc..
To deploy a custom master page, see my blog post http://me-and-my-sharepoint.blogspot.de/2015/11/sharepoint-2010-tutorial-deploying.html
You can also use SharePoint Designer to modify a page.

I deployed a custom master page to hide ribbon items in all document libraries in a site collection.
Register the user control at the top of the page:

<%@ Register TagPrefix="custom" TagName="RibbonBarControl" src="~/_controltemplates/TestRibbonsHideProject/RibbonControl.ascx" %>


We've created user control for SharePoint 2010, registered it on the page. Now, the final step is to  include the user control in the page itself:


<custom:RibbonControl id="RibbonControl1" runat="server"></custom:RibbonControl>


Then we are ready to deploy the solution.

See the ribbon bar before activating our user control:


Then afterwards:


Hope you enjoyed it. Feel free to leave a comment, if you like (or not) ;-)

Friday, November 20, 2015

SharePoint 2010 - Tutorial - Deploying a custom master page

Please feel free to comment my new tutorial "Deploying a custom master page" in a SharePoint 2010 enviroment. Enjoy.

The first step is to add feature to your project, if you have not already one. 
I created an empty SharePoint project for this tutorial.


Ensure, that the feature scope is set to "Site" to apply the master page to all webs in this site collection.


Then add a "Module" to the project. You can give any name:


After the module is created it contains an "elements.xml" and "sample.txt" file. The "sample.txt" file can be renamed to "sample.master".

Your project then should cotain these elements:


Best practice: Open the SharePoint Designer, navigate to the current master file and edit it.
Note: In SharePoint 2010 the default master page is "v4.master" and NOT "default.master"


Copy the contents of "v4.master" in your "sample.master" and do your changes on the code.

Then make sure, that your "elements.xml" of the module looks like this:


<?xml version="1.0" encoding="utf-8"?>
<Elements xmlns="http://schemas.microsoft.com/sharepoint/">
  <Module Name="Module1" List="116" Url="_catalogs/masterpage">
  <File Path="Module1\sample.master" Url="sample.master" Type="GhostableInLibrary" IgnoreIfAlreadyExists="FALSE" />
</Module>
</Elements>
You could stop here and this solution will deploy your "sample.master" master page to the master page gallery of your site collection. 
This will not apply the master page to the site collection when the feature gets activated though. It will only make it available for selection.

If you want to apply your "sample.master" file, when the feature gets activated, add an event receiver to your feature via right-click on the feature and selection "Add Event Receiver".


Open "Feature1.EventReceiver.cs" and comment in "FeatureActivated" and "FeatureDeactivating" methods. Then paste the following code in it:

public override void FeatureActivated(SPFeatureReceiverProperties properties)
{
            try
            {
                using (SPSite site = (SPSite)properties.Feature.Parent)
                {
                    using (SPWeb web = site.RootWeb)
                    {
                        // Create full master url
                        Uri masterUri = new Uri(web.Url + "/_catalogs/masterpage/sample.master");

                        // Master page used by all forms and pages on the site that are NOT publishing pages
                        web.MasterUrl = masterUri.AbsolutePath;

                        // Master page used by all publishing pages on the site
                        web.CustomMasterUrl = masterUri.AbsolutePath;
                        web.Update();
                    }
                }
            }
            catch (Exception exp)
            {
                throw exp;
            }
}

public override void FeatureDeactivating(SPFeatureReceiverProperties properties)
{
            try
            {
                using (SPSite site = (SPSite)properties.Feature.Parent)
                {
                    using (SPWeb web = site.RootWeb)
                    {
                        // Create full master url
                        Uri masterUri = new Uri(web.Url + "/_catalogs/masterpage/v4.master");

                        // Master page used by all forms and pages on the site that are NOT publishing pages
                        web.MasterUrl = masterUri.AbsolutePath;

                        // Master page used by all publishing pages on the site
                        web.CustomMasterUrl = masterUri.AbsolutePath;
                        web.Update();
                    }
                }
            }
            catch (Exception exp)
            {
                throw exp;
            }
}


If you activate the feature, the code in the feature receiver will be executed and will apply "sample.master" to the site collection. As you can see we change both the MasterUrl and the CustomMasterUrl. The MasterUrl is used on all pages that are not publishing pages. This means it is used on the pages in the sitepages library and on the pages in the _layouts directory like the settings page for instance. The CustomMasterUrl is only used on pages that are stored in the Pages library. This library is created when the SharePoint Server Publishing Infrastructure features is activated on the site collection and the SharePoint Server Publishing feature is activated on the site.

Wednesday, June 11, 2014

SharePoint 2010 - Tutorial - Create an event receiver with custom error message on redirect url while item updating

Today I would like to show you, how you can use event receivers to check documents / items in a list and give the user immediately a feeback about an error, while he is still in the edit form of the item / document.
That can be useful for users, because they don't leave the edit form and can correct the error immediately without opening the edit mask again.
We start with an empty SharePoint Project in Visual Studio 2010.


Set a project name ("SPProject"), then provide the url and set the trust level ("Farm solution").


The first step is to add the list definition with list instance to our project. That will be our list, where the event receiver will be listen on. Right-click the project name in the project explorer and choose "Add" -> "New Item".


From the list select "List Defintion" and set a name for it ("ListDefinition"), then press "Add".


On the next screen you have to enter a name for the list definition ("SPProject - ListDefinition"). Also you have to choose, which type the list should be. In my case it was a document library, but you can use other types as well. Ensure that the box "Add a list instance for the list definition" is ticked.


After we have added the list defintion, we can add our event receiver. The event receiver will check our doucment and return an error to the edit form, when the item / document is not ok. So we right-click again on the project name in the project explorer and choose "Add" -> "New Item" again.


Now we choose "Event Receiver" from the list and set again a name ("EventReceiver").


On the next screen, we have to decide, which type of event receiver we would like to have. We want the event receiver to check the items of a list - so our choice is "List Item Events".
Then we have to tell SharePoint on which list the event receiver should listen. That is our created list instance from our list definition ("SPProject - ListDefinition").
The last point we have to decide, when the event receiver should start its work. We select "An item is being added".


In the file "EventReceiver.cs" we can add now our code, our logic to check the item / document.
I keep it simple for this example. I will only check if the title property starts with the word "SharePoint", otherwise I want to give an error message to the user. You can put in there more complex logic according to your needs.
Open the "EventReceiver.cs" and search for the method "ItemUpdating". Overwrite the method with your code:

/// <summary>
/// An item is being updated.
/// </summary>
public override void ItemUpdating(SPItemEventProperties properties)
{
  try
  {
    base.ItemUpdating(properties);
    // ensure that the code will be executed only once
    if ((properties.AfterProperties["vti_sourcecontrolcheckedoutby"] == null && properties.BeforeProperties["vti_sourcecontrolcheckedoutby"] != null) || (properties.AfterProperties["vti_sourcecontrolcheckedoutby"] == null && properties.BeforeProperties["vti_sourcecontrolcheckedoutby"] == null))
    {
      // check title property
      if (properties.AfterProperties["vti_title"].ToString().StartsWith("SharePoint") == false)
      {
        // redirect
        properties.RedirectUrl = @"EditForm.aspx?"
                                 + "Mode=Upload"
                                 + "&CheckInComment="
                                 + "&ID=" + properties.ListItem.ID
                                 + "&RootFolder=%2Fsites%2FIT%2FLists%2FSPProject-ListInstance1"
                                 + "&IsDlg=1"
                                 + "&ContentTypeId=" + properties.ListItem.ContentType.Id
                                 + "&IsDlg=1";
        properties.Status = SPEventReceiverStatus.CancelWithRedirectUrl;
       }
      }
     }
     catch (Exception exp)
     {
       throw exp;
     }
 
}
I use the property "vti_sourcecontrolcheckedoutby" to ensure that the code is executed once and nor multiple times. If you have enabled versioning in your list, the event will be fired muliple.
Then I use the AfterProperties to check the title. If the check fails, SharePoint should redirect the user to a specific url. We set the url to our editform.aspx of the list. 
Note: You have to check the bold marked area in the code (RootFolder parameter). You have to change this to your list url!

Now we can start the solution. Navigate to the list, add an item and edit the properties afterwards. You will see that the title have to start with the word "SharePoint", otherwise the popup comes up again when saving.


But we still have no error displayed to the user. The user would be confused now, because he don't knows what is wrong and why he cannot save the properties.

To display an error on the editform.aspx of the list, we create a simple visual webpart.
We add another item to our project via right-click on the project name in the project explorer.


Select "Visual WebPart" from the list and set a name ("VisualWebPart").


To the visual webpart we add just a label ("Label1") from the toolbox ("VisualWebPartUserControl.ascx").


In my solution I did some small changes to the label, like red color, another font, cleared the text property of the label etc, but this is up to you, how you design the label.

Now we open the code-behind file "VisualWebPartUserControl.ascx.cs" and modify the Page_Load method.

protected void Page_Load(object sender, EventArgs e)
{
  string ErrorMessage = System.Web.HttpUtility.ParseQueryString(System.Web.HttpContext.Current.Request.Url.Query).Get("error");
  this.Label1.Text = ErrorMessage;
}

Explanation:
We use the HttpUtility class to get the parameter "error" from the current url. The paramter "error" we will use later for our custom error message.
The content of the error parameter we put in our label text property.

Now we have our webpart for displaying the error message, but we still have to put in the editform.aspx of our list.
Therefore we open the file "schema.xml" of our list definition and search for the "<Forms>" section in it.
It should similar look like this:


Now we create our custom editform.aspx by creating a new <Form> from type "EditForm". Give a own name ("MyEditForm.aspx") and set default = true:


Code:
      <Form Type="EditForm"
            SetupPath="pages\form.aspx"
            WebPartZoneID="Main"
            Url="Forms/MyEditForm.aspx"
            Default="TRUE">
        <WebParts>
          <AllUsersWebPart WebPartZoneID="Main" WebPartOrder="0">
            <![CDATA[
            ]]>
          </AllUsersWebPart>
        </WebParts>
      </Form>

Now we have a custom editform.aspx, but we still have to put our webpart in it. Actually we have the same editform as the standard one. Open the file "VisualWebPart.webpart" from the project explorer.


Copy the complete code except the first line ("<?xml version....>) and paste it in the CDATA area in the schema.xml.
Your form code in your schema.xml should look like this now:


Code:
 <Form Type="EditForm"
            SetupPath="pages\form.aspx"
            WebPartZoneID="Main"
            Url="Forms/MyEditForm.aspx"
            Default="TRUE">
        <WebParts>
          <AllUsersWebPart WebPartZoneID="Main" WebPartOrder="0">
            <![CDATA[
            <webParts>
            <webPart xmlns="http://schemas.microsoft.com/WebPart/v3">
              <metaData>
                <type name="SPProject.VisualWebPart.VisualWebPart, $SharePoint.Project.AssemblyFullName$" />
                <importErrorMessage>$Resources:core,ImportErrorMessage;</importErrorMessage>
              </metaData>
              <data>
                <properties>
                  <property name="Title" type="string">VisualWebPart</property>
                  <property name="Description" type="string">My Visual WebPart</property>
                </properties>
              </data>
            </webPart>
          </webParts>
            ]]>
          </AllUsersWebPart>
        </WebParts>
      </Form>

Now we have embedded the webpart in our custom editform.aspx.
We have to tell the event receiver, that it should redirect to our new custom editform.aspx ("MyEditForm.aspx") and we have to add the error parameter to our url.
Navigate back to the event receiver code file ("EventReceiver.cs") and modify the redirect url:

properties.RedirectUrl = @"MyEditForm.aspx?"
                         + "Mode=Upload"
                         + "&CheckInComment="
                         + "&ID=" + properties.ListItem.ID
                         + "&RootFolder=%2Fsites%2FIT%2FLists%2FSPProject-ListInstance1"
                         + "&IsDlg=1"
                         + "&ContentTypeId=" + properties.ListItem.ContentType.Id
                         + "&IsDlg=1"
                         + "&error=Error in Title - Must start with SharePoint";

Changes in code are marked in bold.
We changed the aspx file from "EditForm.aspx" to "MyEditForm.aspx" and added the parameter "error" with a custom error message.


Let's start the solution now. Navigate to the list, add an item and edit the properties afterwards. Click "Save" with an empty title. Now you should get the error message:


If you enter a text beginning with the word "SharePoint" in the title property the popup will disappear.
Hope you enjoyed this lesson. :-)

Wednesday, April 30, 2014

SharePoint 2010 - Using REST in client application

Hi guys,

today I want to show you, how you to get data from a SharePoint 2010 Server by using a REST client. 

Imagine we have a document library "How To" in a site collection "IT" on a SharePoint 2010 Server like this one:


We write a small console application to request all documents from this document library. The user can enter a search string and the results will be displayed after the input.

Ok, let's create a new solution in Visual Studio 2010:

I called the solution "REST-Solution".
Press "Ok" to create it.

After Visual Studio has created the solution, we have to add a service reference.

We have to enter the address to the service. In SharePoint 2010 we always find this service for each site in the "_vti_bin" folder. It's name is listdata.svc.
You can enter a different namespace in the text line. I called it ServiceReference1.


After adding the service reference to the project, we need to add 2 rows in the "using"-section:


Code Section: 
using REST_Solution.ServiceReference1;
using System.Net;
Note: In the first line, you have to use your solution name with the name of your service reference.

Then we can add our code.

Note:
The class name of the data context ("ctx" object) depends of the name of your Sharepoint site. In my case it is "IT", so the class name is "ITDataContext".
I think, the code is self-explanatory.

Code Section:
using System;
using System.Collections.Generic;
using System.Linq;
using System.Text;
using REST_Solution.ServiceReference1;
using System.Net;
namespace REST_Solution
{
    class Program
    {
        static void Main(string[] args)
        {
            // Create Uri
            Uri myUri = new Uri("http://testportal.grolman.de/sites/IT/_vti_bin/listdata.svc");
            // Create DataContext with Uri
            ITDataContext ctx = new ITDataContext(myUri);
            // Set Credentials
            ctx.Credentials = CredentialCache.DefaultCredentials;
            Console.WriteLine("Please enter search string:");
            // Get user input:
            string searchString = Console.ReadLine();
            // Create Query
            var linqQuery =
                from document in ctx.HowTo
                where document.Name.Contains(searchString)
                select document;
            // Results
            Console.WriteLine("Results:");
            foreach (HowToItem howtoItem in linqQuery)
            {
                Console.WriteLine("Document: " + howtoItem.Name + " / Version: " + howtoItem.Version);
            }
            // Stop here, wait for user input
            Console.ReadLine();
        }
    }
}
That's all. Start the program and you see it works fine:

All without using the client object model of SharePoint.